# HomeLab
# Architecture
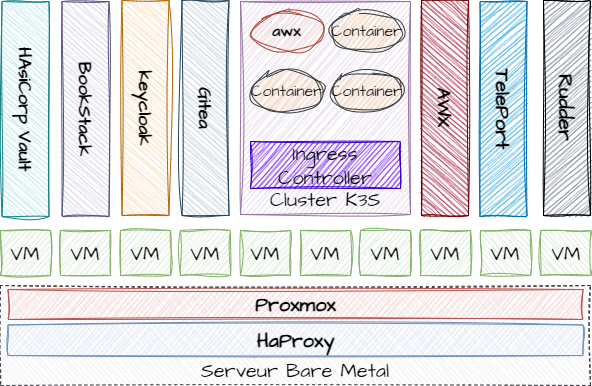
#### Architecture cible envisagée
#### Principe du Homelab Ops
Le principe du homelab que je souhaite mettre en place est la mise en place d'un outillage standard utilisé par une équipe Ops pour la gestion du "Build" et du "Run" d'un SI.
##### Etape 1 - Choix du matériel
##### Etape 2 - Choix de l'hyperviseur
Pour porter l'outillage, il est nécéssaire dans un premier temps d'avoir une couche de virtualisation et d'ochestration de container. Le choix s'est porté sur Proxmox pour plusieurs raisons:
\- solution d’orchestration reconnue
##### Etape 3 - Mise en place de l'outillage
##### Etape 4 - Et si on jouait avec Kubernetes
# Création et configuration du serveur Proxmox
#### Autorisation des VMS du réseau interne à aller sur internet (mode NAT)
Sur le server Proxmox, effectuer les opération suivantes
- Activer dans un des fichiers de conf sysctl "/etc/sysctl.d/99-xxx.conf" le forward IP.
```
net.ipv4.ip_forward=1
```
- Créer les règles de NAT via iptable
```
iptables -t nat -A POSTROUTING -o eno1 -j MASQUERADE
iptables -A FORWARD -i vmbr0 -j ACCEPT
```
- Sauvegarder la configuration iptables dans "/etc/default/iptables"
```
iptables-save > /etc/default/iptables
```
- Créer le fichier "/etc/network/if-pre-up.d/iptables" pour recharger le configuration iptables lors du reboot
```
#!/bin/sh
/usr/sbin/iptables-restore
```
- Le rendre éxécutable
```
chmod +x /etc/network/if-pre-up.d/iptables
```
#### Installation d'un HaProxy sur le serveur Proxmox pour proxifier les VMs
Installer HaProxy
```
apt install haproxy
```
# Création d'un cluster K8S sur proxmox
## Création de 3 VMS en désactivant le SWAP
1. $ free -h.
2. $ sudo swapoff -a.
3. $ sudo nano /etc/fstab.
4. \# /dev/sda3 none swap sw 0 0.
5. $ sudo swapoff -a.
## Installation des outils
1. Update the `apt` package index and install packages needed to use the Kubernetes `apt` repository:
```shell
sudo apt-get update
sudo apt-get install -y apt-transport-https ca-certificates curl gpg
```
2. Download the public signing key for the Kubernetes package repositories. The same signing key is used for all repositories so you can disregard the version in the URL:
```shell
curl -fsSL https://pkgs.k8s.io/core:/stable:/v1.29/deb/Release.key | sudo gpg --dearmor -o /etc/apt/keyrings/kubernetes-apt-keyring.gpg
```
**Note:** In releases older than Debian 12 and Ubuntu 22.04, folder `/etc/apt/keyrings` does not exist by default, and it should be created before the curl command.
3. Add the appropriate Kubernetes `apt` repository. If you want to use Kubernetes version different than v1.29, replace v1.29 with the desired minor version in the command below:
```shell
echo 'deb [signed-by=/etc/apt/keyrings/kubernetes-apt-keyring.gpg] https://pkgs.k8s.io/core:/stable:/v1.29/deb/ /' | sudo tee /etc/apt/sources.list.d/kubernetes.list
```
**Note:** To upgrade kubectl to another minor release, you'll need to bump the version in `/etc/apt/sources.list.d/kubernetes.list` before running `apt-get update` and `apt-get upgrade`. This procedure is described in more detail in [Changing The Kubernetes Package Repository](https://kubernetes.io/docs/tasks/administer-cluster/kubeadm/change-package-repository/).
4. Update `apt` package index, then install kubectl:
```shell
sudo apt-get update
sudo apt-get install -y docker.io kubelet kubeadm kubectl kubernetes-cni
```
```
containerd config default | sudo tee /etc/containerd/config.toml >/dev/null 2>&1
```
Edit the file ‘/etc/containerd/config.toml’ and look for the section ‘\[plugins.”io.containerd.grpc.v1.cri”.containerd.runtimes.runc.options\]’ and change ‘SystemdCgroup = false’ to ‘SystemdCgroup = true‘
```
$ sudo vi /etc/containerd/config.toml
```
[](https://www.linuxtechi.com/wp-content/uploads/2022/09/Enable-SystemCgroup-Containerd-Debain12.png)
Save and exit the file.
reboot
## Initialisation du kube
Sur le noeud 1
```
kubeadm init
```
To start interacting with cluster, run following commands on master node,
```
$ mkdir -p $HOME/.kube
$ sudo cp -i /etc/kubernetes/admin.conf $HOME/.kube/config
$ sudo chown $(id -u):$(id -g) $HOME/.kube/config
```
Run following kubectl command to get nodes and cluster information,
```
$ kubectl get nodes
$ kubectl cluster-info
```
Output of above commands
## Ajout de nodes dans le kube
# Création d'un cluster k3s mono-noeud sur Rocky Linux
## Mise en place des pré-requis
#### Désactiver firewalld
```bash
systemctl stop firewalld
systemctl disable firewalld
```
#### Désactiver selinux en modifiant le fichier /etc/sysconfig/selinux
```ini
# This file controls the state of SELinux on the system.
# SELINUX= can take one of these three values:
# enforcing - SELinux security policy is enforced.
# permissive - SELinux prints warnings instead of enforcing.
# disabled - No SELinux policy is loaded.
# See also:
# https://access.redhat.com/documentation/en-us/red_hat_enterprise_linux/9/html/using_selinux/changing-selinux-states-and-modes_using-selinux#changing-selinux-modes-at-boot-time_changing-selinux-states-and-modes
#
# NOTE: Up to RHEL 8 release included, SELINUX=disabled would also
# fully disable SELinux during boot. If you need a system with SELinux
# fully disabled instead of SELinux running with no policy loaded, you
# need to pass selinux=0 to the kernel command line. You can use grubby
# to persistently set the bootloader to boot with selinux=0:
#
# grubby --update-kernel ALL --args selinux=0
#
# To revert back to SELinux enabled:
#
# grubby --update-kernel ALL --remove-args selinux
#
SELINUX=disabled
# SELINUXTYPE= can take one of these three values:
# targeted - Targeted processes are protected,
# minimum - Modification of targeted policy. Only selected processes are protected.
# mls - Multi Level Security protection.
SELINUXTYPE=targeted
```
#### Installer les packages manquants suivants
```bash
dnf install -y git tar bash-completion
```
#### Modifier les paramètres kernel suivants en créant le fichier /etc/sysctl.d/99-tunning.conf
```ini
#Disable IP V6
net.ipv6.conf.all.disable_ipv6 = 1
net.ipv6.conf.default.disable_ipv6 = 1
#tunning fs
fs.aio-max-nr = 1048576
fs.file-max = 6815744
#Limit Swap
vm.swappiness = 10
vm.max_map_count = 262144
vm.overcommit_memory = 1
net.core.somaxconn=65535
#Tuning IPV4
net.ipv4.ip_local_port_range = 10000 65500
net.ipv4.tcp_keepalive_time=30
net.ipv4.tcp_keepalive_intvl=30
net.ipv4.tcp_keepalive_probes=10
```
#### Rebooter le server
## Installation de kubectl et d'un kube k3s
### Installation de kubectl
#### Télécharger le binaire kubectl et le déposer dans /usr/local/bin/
```bash
curl -LO https://dl.k8s.io/release/$(curl -Ls https://dl.k8s.io/release/stable.txt)/bin/linux/amd64/kubectl
chmod +x ./kubectl
sudo mv ./kubectl /usr/local/bin/kubectl
```
#### Modifier le bashrc pour ajouter /usr/local/bin dans la variable $PATH
```bash
...
...
export PATH=$PATH:/usr/local/bin
...
```
#### Ajouter la completion sur kubectl
```bash
echo 'source <(kubectl completion bash)' >>~/.bashrc
```
#### Vérifier que le binaire est opérationnel
```
kubectl version --client
```
#### Installation de K3S sans le composant “Traeffik” et en choisissant un CIDR qui n'overlap pas un réseau existant
```bash
curl -sfL https://get.k3s.io | K3S_KUBECONFIG_MODE="644" INSTALL_K3S_EXEC="--cluster-cidr=192.168.255.0/24 --disable=traefik" sh -
```
#### A la fin du déploiement, créer le fichier d'authentification / connection au cluster kubernetes pour le client kubectl
```
mkdir ~/.kube
cp /etc/rancher/k3s/k3s.yaml ~/.kube/config
```
#### Vérifier que le kube est correctement démarrer
```
kubectl get pods --all-namespaces
NAMESPACE NAME READY STATUS RESTARTS AGE
kube-system coredns-0587-fbcd5-sdfsf 1/1 Running 0 84s
kube-system local-path-provisioner-fdsfsfs-r6pbm 1/1 Running 0 84s
```
# Déploiement de AWX
## Installation de awx
#### Les prérequis suivant sont nécéssaires
***kubectl est installé et configuré pour se connecter à un cluster kubernetes***
#### Création du dossier d'installation
```bash
mkdir ~/install-awx
```
#### Créer le fichier ~/install-awx/kustomization.yaml pour déployer la dernière version de awx-operator
- Remplacer la valeur 2.18.0 par la dernière version disponible : https://github.com/ansible/awx-operator
```yaml
apiVersion: kustomize.config.k8s.io/v1beta1
kind: Kustomization
resources:
# Find the latest tag here: https://github.com/ansible/awx-operator/releases
- github.com/ansible/awx-operator/config/default?ref=2.18.0
- awx-deploy.yml
# Set the image tags to match the git version from above
images:
- name: quay.io/ansible/awx-operator
newTag: 2.18.0
# Specify a custom namespace in which to install AWX
namespace: awx
```
#### Déployer awx-operator
```bash
cd ~/install-awx/
kubectl apply -k .
```
#### Création du fichier ~/install-awx/awx-deploy.yml
```yaml
---
apiVersion: awx.ansible.com/v1beta1
kind: AWX
metadata:
name: awx
spec:
service_type: nodeport
```
#### Lancer l'installation de awx
```bash
cd ~/install-awx/
kubectl apply -k .
```
#### Suivre le déploiement en regardant les logs de déploiement
```bash
kubectl logs -f deployments/awx-operator-controller-manager -c awx-manager -n awx
```
#### A la fin du déploiement vérifier que les 4 pods sont déployés
```
kubectl get pods -n awx
NAME READY STATUS RESTARTS AGE
awx-postgres-13-0 1/1 Running 2 (2d20h ago) 3d13h
awx-operator-controller-manager-66c5b94884-l8hkk 2/2 Running 6 (2d20h ago) 3d13h
awx-task-5c97798797-5q8tn 4/4 Running 8 (2d20h ago) 3d13h
awx-web-7fcd58c7b9-md59b 3/3 Running 6 (2d20h ago) 3d13h
```
#### Récupération des informations utiles
Récupérer le port exposé en local du service awx pour le proxifier/exposer par la suite
- Dans l’exemple ci-dessous le port exposé est le port TCP 32524 qui expose le port interne 80
```
kubectl get service awx-service -n awx
NAME TYPE CLUSTER-IP EXTERNAL-IP PORT(S) AGE
awx-service NodePort 10.43.29.126 80:32524/TCP 3d13h
```
Récupérer le mot de passe du compte “admin” présent dans le secret “awx-admin-password” via la commande suivante
```
kubectl get secret awx-admin-password -o go-template='{{range $k,$v := .data}}{{printf "%s: " $k}}{{if not $v}}{{$v}}{{else}}{{$v | base64decode}}{{end}}{{"\n"}}{{end}}' -n awx
```
## Mise à jour de awx
#### Modifier le fichier ~/install-awx/kustomization.yaml pour déployer la dernière version de awx-operator
- Remplacer la valeur 2.18.0 par la dernière version disponible : [https://github.com/ansible/awx-operator](https://github.com/ansible/awx-operator)
```yaml
apiVersion: kustomize.config.k8s.io/v1beta1
kind: Kustomization
resources:
# Find the latest tag here: https://github.com/ansible/awx-operator/releases
- github.com/ansible/awx-operator/config/default?ref=2.18.0
- awx-deploy.yml
# Set the image tags to match the git version from above
images:
- name: quay.io/ansible/awx-operator
newTag: 2.18.0
# Specify a custom namespace in which to install AWX
namespace: awx
```
#### Exécuter les commandes suivantes pour mettre à jour awx
```
kubectl delete deployment awx-operator-controller-manager -n awx
kubectl delete serviceaccount awx-operator-controller-manager -n awx
kubectl delete rolebinding awx-operator-awx-manager-rolebinding -n awx
kubectl delete role awx-operator-awx-manager-role -n awx
cd ~/install-awx/
kubectl apply -k .
```
# Installation de forgejo sur rocky-linux en mode binaire
## Installation des pré-requis
#### Installation des packages manquants
```
dnf install -y git git-lfs wget
```
## Installation de mariadb-server
#### Installer le package mariadb-server
```
dnf install -y mariadb-server
```
#### Activer et démarrer le service mariadb
```
systemctl enable mariadb
systemctl start mariadb
```
#### Créer la base de données forgejo et l'utilisateur associé
```
create database forgejo CHARACTER SET = utf8mb4 COLLATE utf8mb4_unicode_ci;
grant all privileges on forgejo.* TO 'forgejo'@'127.0.0.1' identified by 'PASSWORD';
flush privileges;
```
## Installation de forgejo
#### Création du groupe et du user associé au futur service
```
groupadd --system git
adduser --system --shell /bin/bash --comment 'Git Version Control' --gid git --home-dir /home/git --create-home git
```
#### Création des dossiers qui seront utilisés par le service
- Création du dossier /var/lib/forgejo qui contiendra les données
```
mkdir /var/lib/forgejo
chown git:git /var/lib/forgejo && chmod 750 /var/lib/forgejo
```
- Création du dossier /etc/forgejo qui contiendra le fichier de configuration app.ini
```
mkdir /etc/forgejo
chown root:git /etc/forgejo && chmod 770 /etc/forgejo
```
#### Recuperation du binaire forgejo
```
cd /usr/local/bin
wget https://codeberg.org/forgejo/forgejo/releases/download/v7.0.4/forgejo-7.0.4-linux-amd64
chmod 755 /usr/local/bin/forgejo-7.0.4-linux-amd64
ln -s forgejo-7.0.4-linux-amd64 forgejo
```
#### Installation du service
```
wget -O /etc/systemd/system/forgejo.service https://codeberg.org/forgejo/forgejo/raw/branch/forgejo/contrib/systemd/forgejo.service
```
#### Ouverture firewall du port tcp/3000 sur firewalld
```bash
firewall-cmd --permanent --add-port=3000/tcp
firewall-cmd --reload
```
#### Démarrage du service forgejo
```
systemctl enable forgejo.service
systemctl start forgejo.service
```
# Outils à suivre
[https://plane.so](https://plane.so)
[https://www.drone.io/](https://www.drone.io/)
[https://www.keycloak.org/](https://www.keycloak.org/)
[https://www.travis-ci.com/](https://www.travis-ci.com/)
[https://github.com/D10S0VSkY-OSS/Stack-Lifecycle-Deployment](https://github.com/D10S0VSkY-OSS/Stack-Lifecycle-Deployment)
[https://semaphoreui.com/](https://semaphoreui.com/)
[https://spacelift.io/](https://spacelift.io/)
## Registry Docker
- [https://www.projectquay.io/](https://www.projectquay.io/)
- [https://goharbor.io/](https://goharbor.io/)
## Solution GitOps
- ArgoCD : [https://argoproj.github.io/cd/](https://argoproj.github.io/cd/)
- Flux : [Flux (fluxcd.io)](https://fluxcd.io/)
- Kargo : [GitHub - akuity/kargo: Application lifecycle orchestration](https://github.com/akuity/kargo)
## Partage de helm operator
- [https://operatorhub.io/](https://operatorhub.io/)